
Introduction
As an Arranger, Debt Syndication enables you to streamline the organisation of a syndication by inviting your partners to participate, sharing documentation with them, and collecting their responses in real time—making it easier to build your pool. Throughout the syndication process, an internal messaging system is available to communicate effectively with your partners. Once syndication is complete, you may send the deal details to the Middle Office team with a single click. By managing your deals in the tool, all elements are tracked and centralised for you and your stakeholders.
Debt Syndication support several use cases:
- Gathering indications of interest (Expressions of interest)
- Facilitating Firm responses
- Selling debt on the secondary market to manage your risk
- Acting as lead banker, syndicating discreetly
Summary |
1. Key Steps

The syndication process consists of four steps, all managed by the Arranger:
- Draft, the initial step when creating a transaction, and divided into two parts:
- Creating the financing deal : enter essential information such as transaction name, amount, upload documentation and the term sheet, etc.—to provide context for your stakeholders.
- Preparing to send invitations: choose which banks to invite and specify the amounts. Once selected, you can send invitations and proceed to the next stage.
- Firm responses : your partners receive invitations to access the deal and submit their responses based on your offer. They review the information you provided and may indicate a committee approval or another decision. As Arranger, you can monitor all responses. Once a sufficient total value of offers is reached, proceed to final allocations.
- Final allocations: adjust allocations for each partner (increase or decrease) to form your final pool. Once allocations are confirmed, the syndication can be closed.
- Syndication completed: the final stage freezes your deal, which remains recorded and accessible for five years by you and your partners with access rights.
💡 Between Draft and Firm Response, you may use “Expression of Interest” to identify interested entities prior to the main syndication. This step is optional and helps refine your strategy before commitment is requested. You may choose whether to include this step when creating a file, or proceed directly to requesting firm responses.
=> Moving from one step to another is always at the Arranger’s discretion.
2. Draft
To create a new deal, open the Debt Syndication app in Kls Desk, and access the Arranger interface via the side navigation bar.
On the transaction tracking page, you can:
- View your portfolio, centralising all accessible deals (whether you are the creator or given access), organised by syndication stage.
- Create a new deal with the “Create a new transaction” button at the top right.
If you cannot see this button, you may do not yet have creation rights. Please contact your manager or a Kls team administrator for access.
To create a new transaction, enter:
- The name of the risk group
- The folder name
- The total funding amount
- The type of market
After confirmation, the deal is created.
a. Create a syndicated transaction
Provide essential context to invited banks by completing required and optional fields.
Mandatory fields:
- Type of transaction
- Process: "Expression of Interest > "Firm Response” or “Firm Response” directly.(Expressions of interest allow engagement from select banks in an initial round, then a firm response.) You may switch to “Firm Response” at any time, even if all responses have not been received.
💡 Most of the users opt to go directly to the Firm Response stage.
- Transaction summary, contextualising your deal
- Financing tranches, detailing the deal structure (all must be completed; comments are optional)
- Arranger information, visible only to you and your entity’s users with deal access
- Preferred contact for participants, should specific queries arise
- Indicative deal calendar, providing timing info purely for reference; does not affect timings within the tool
Optional fields:
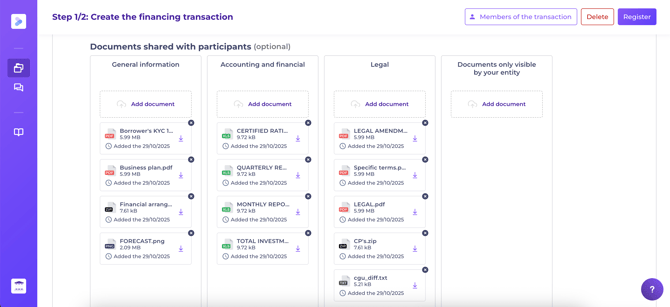
- Documents shared with participants (secure dataroom, tracked and downloadable at any time)
- Term sheet section (upload in PDF format for participants’ access)
- Actors of the transaction: any additional banks syndicating the deal (keeps all informed)
- NDA management:
- Upload a personalised NDA from your server
- Use a generic NDA provided by Kls
- Option not to include an NDA
- Where used, participants must sign the NDA to access the file. As Arranger, you can see signatory status and access rights.
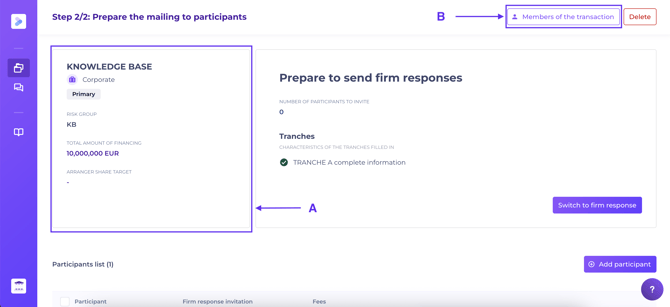
Once the information is complete, click “Save and go to the next step” to proceed to sending invitations.
You can return to the creation page (A) to modify tranches or dataroom, or edit deal members (B) to grant read/edit rights at any time.
b. Prepare to send invitations
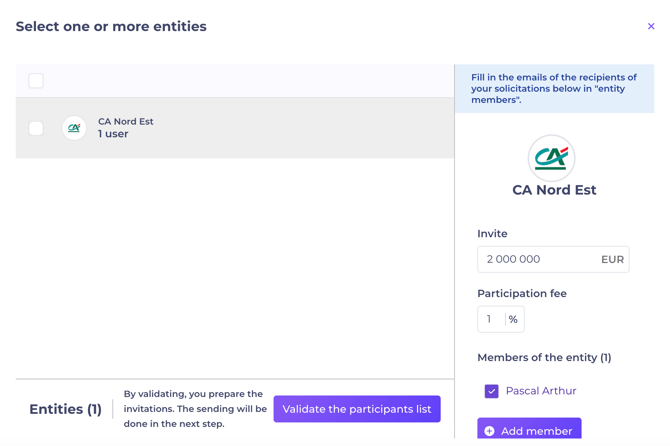
- Invite other banks with “Invite participant”, then use the search bar to select the bank.
- Set invitation amounts, fees, and tranches.
- Enter email addresses for contacts—suggested contacts are pre-authorised. If not yet listed, simply enter the new address.
- After inviting all desired banks, click “Switch to firm response” to move to the next phase and send invitations.
At the Firm Response stage, all transaction details remain editable.
If using the step, send your invitations by clicking “Send as an Expression of interest", and move to Firm Response stage at any time.
3. Firm Response
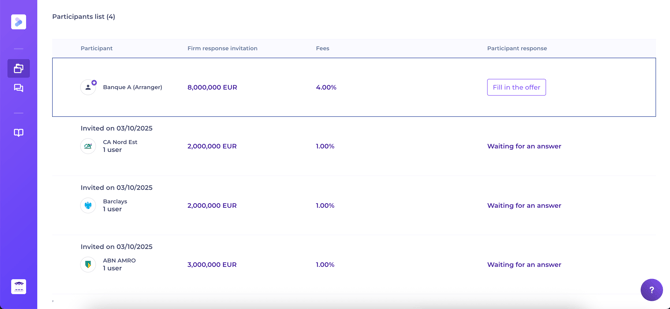
Partners now access the deal. You are notified by email when a participant responds (see Notifications). The latest status is tracked at the top right: total offers, approvals, and refusals, updated in real time.
At any time, you may:
- Invite additional banks as needed
- Archive a bank (box icon at row's end)
- Re-invite previously declined or archived participants (box icon)
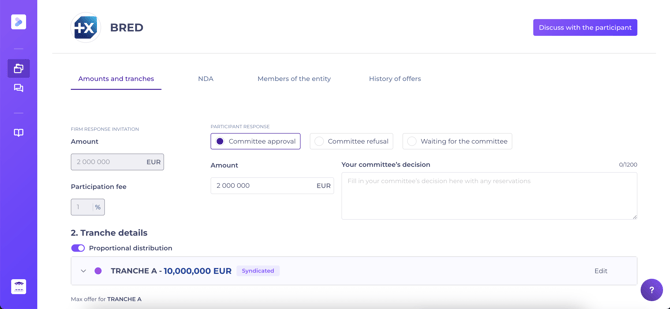
By selecting any invited bank’s name, you can:
- Communicate: send messages to the participant, tracked and notified by email, with attachments if needed.
- Respond on their behalf: indicate committee approval/refusal, including participation amounts per tranche. The response will be labelled accordingly.
- Add specific NDA: just for this participant.
- Add or remove contacts with file access.
- View offer history.
Once the desired syndication amount is reached, move to Final Allocations.
After this, you can no longer invite new participants—only do this at the last moment before closing or locking your deal. You cannot revert.
4. Final allocations
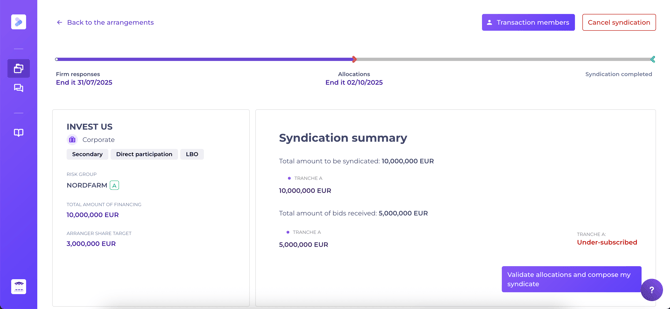
- Adjust allocations for all participants (including your own entity) per tranche.
- Confirm by clicking “Validate allocations and compose my syndicate” to move to “Syndication completed”.
Check all allocations—reversal is not possible after this stage.
5. Syndication completed
The deal is now locked, remaining accessible to you and your stakeholders for five years post-closing.
You may still add documents to the dataroom or use the messaging feature.
6. Move the deal into Debt Tracking
Debt Tracking enables ongoing, collaborative monitoring of financing lines and contractual commitments within your entity, with partners or clients. See the article: Debt Tracking features.
After completion in Debt Syndication, you or the Agent can transfer the deal to Debt Tracking for closing preparations, stakeholder access, and sharing KYC/CP documentation via the dataroom.
To do so, navigate to Debt Tracking > Operations > Create a new transaction (top right) and tick: “Use a Debt Syndication transaction”.
On creation, the deal’s key details (name, amount, lenders, allocations, etc.) are retrieved.
If the “Create a new transaction” button is not available, you may not have Debt Tracking creation rights—please contact your manager or a Kls team administrator.
If the Agent must create the deal in Debt Tracking, ensure they have appropriate access to the original Debt Syndication file. To add them, use the “Transaction members” section.
7. Notifications
Entity users with transaction access receive automatic immediate email when:
- A participant responds to your invitation
Entity users with transaction access receive a summary email (the next morning) when:
- A participant sends you a message via the internal messaging system
Participants receive immediate email when:
- The Arranger sends invitations/requests (giving access to the transaction)
- The Arranger adds a document to the dataroom
- Syndication is completed
Participants receive a summary email (the next morning) when:
- The Arranger sends a message via the internal messaging system
A support guide is available for your participants — please share as you see fit.