
IntroductionKls is a software publisher offering a suite of tools for banks, debt funds and wider ecosystem. Debt Tracking is a collaborative app specifically designed to simplify the monitoring of credit events and covenants. When invited by the operation manager* in charge of overseeing you financing operation, you are granted access to a workspace in the Desk. This guide explains, step-by-step, how to use Debt Tracking app, from account activation through to managing contractual covenants. *Operation Manager: Credit Officer, Mass Agent, Lead Arranger or Lender responsible for supervising the transaction. |
Contents
|
1. Initialising your account
Upon being invited by the operation manager, you will automatically receive an email notification:
- Account activation, if you do not already have an account
- Invitation, if you already have an active Kls Desk account
If you are already registered, proceed to section 2: Accessing the platform.
If you are new, continue as follows.
The notification mail is sent from no-reply@kls-desk.com. Here a sample activation email:

Click on “Complete the profile” and input your surname, first name, job title, password and telephone number.
Your email address cannot be changed: If you wish to use a different address (e.g., in the case of a change or error), you must add your new address as a new contact and remove the old one. For more information, consult the section on access management.
💡 Tips for finalising your account activation:
-
Ensure that your password contains at least 16 characters, 1 uppercase letter, 1 lowercase letter, 1 number, or 1 special character.
- Check that your area code and phone number are entered in the correct format.
- Remember to accept the Terms & Conditions.
Once activated, your account allows you to access all transaction you have been invited. The “Consult the operation” button will take you to your home page on Kls Desk.
Cannot find your activation email? Try the following :
- Search your inbox and deleted emails for “Kls” or “Initialisation”.
- Check your junk or spam folder.
- Contact the operation manager to request a new notification.
2. Accessing the platform
Access is via the login portal:
Go to: https://app.kls-platform.com/login.
💡 We recommend saving this link as a browser favourite.
Forgotten your password? Click on “Forgot your password?” and you will automatically receive an email with instructions to reset it.
Once logged in, simply click on the relevant folder for the transaction you want to view.
3. Detail of each tab
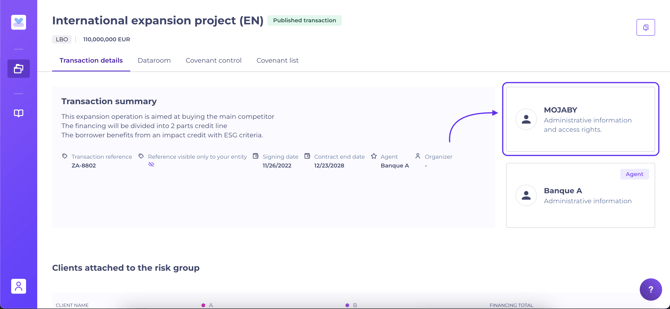
a. Transaction details and access management
This tab displays the general details of your transaction, as entered by the operation manager: a summary, details of financing tranches, and the pool structure.
Click on the entity managing your operation to view its administrative information, including contact details for those managing the deal.

How do I add or revoke access to a transaction?
Access to your entity's operation is managed by the operation manager and your appointed contacts. Once the operation is published, the nominated contacts receive an email invitation.
These contacts can add and revoke accesses (for employees, consultants, etc.) as needed.
To modify contacts, go to the relevant transaction operation details tab, and click “Administrative information and access rights”:
Then click “Transaction access management”:
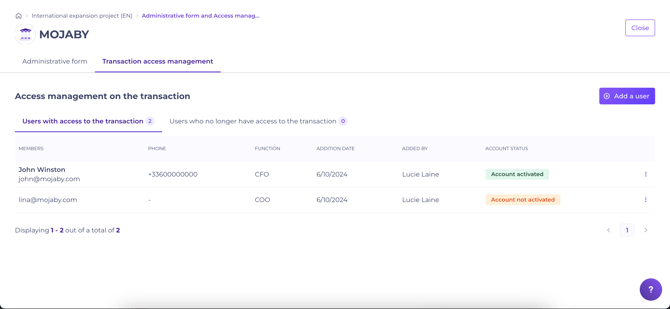
- To add a contact: click “Add a user”, enter their email address and job title, then choose “Invite a user”. The new user will automatically receive a notification to access the transaction.
- To revoke access, click the three dots at the end of the relevant line, select “Revoke folder access”. The user will appear in the “Users who no longer have access to the transaction” tab. All previously performed actions (uploaded documents, covenant responses) remain traceable.
All added users have the same level of access rights for the transaction.
“Account activated” indicates the user has created their account. You may send an email reminder to any user who has not yet activated, also directly from this menu.
Changes to folder access are synchronised between your interface and the operation manager’s in real time.
💡 Need access ? Contact the operation manager or a peer with existing access.
💡If you change role or leave, please ensure your successor is added, so they can revoke your access when required.
Kls Desk, as the publisher, does not intervene in access management for transactions.
b. Dataroom
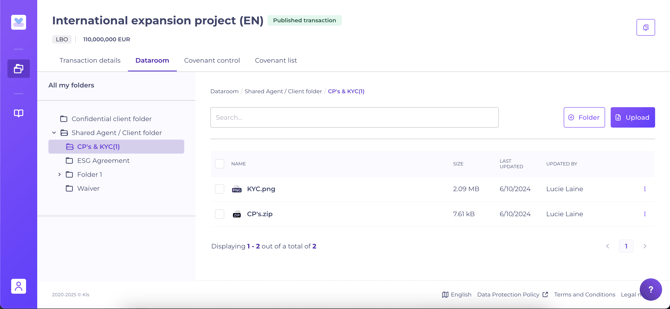
The dataroom enables those with access to the transaction to securely share documents with a restricted group: the operation manager and any approved contacts from your entity.
There are two available subdirectories:
- Confidential folder. Only accessible by your entity's contacts, not visible to the operation manager.
- Agent / Client or Lead Partner / Client shared directory. Accessible by both the operation manager and your entity. Any documents added here are automatically shared with the operation manager.
You can:
- Create subdirectories within the dataroom.
- Add files with without restriction on size, number or format.
- Perform bulk uploads.
- Download files added by either the operation manager or your own teams.
- Duplicate, rename, move and delete files/directories you have created.
You cannot:
- Alter files and subdirectories added by the operation manager.
- Share documents directly with other lenders (pool) for the syndicated transaction.
A daily summary email, listing the documents added to the dataroom, is automatically sent to all transaction contacts. See the section on automatic notifications.
Here's an example of an email:

💡 Each document listed in the summary email is clickable, selecting a link takes you directly to the respective file’s location in the dataroom
If there have been no update, no notification is sent.
c. Covenant control
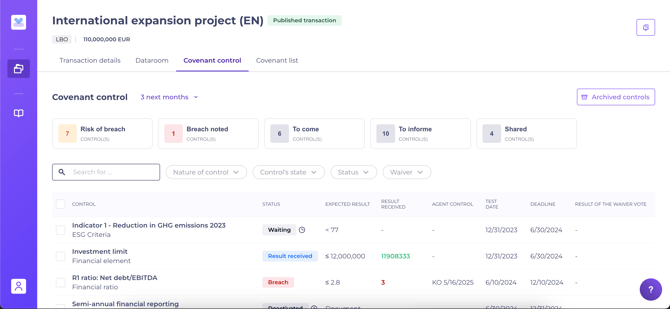
Once a transaction is created, the operation manager digitises covenants in the Covenant List tab.
After these are published, the Covenant Control tab is automatically populated for you to demonstrate compliance.
How does the covenant control table work?
Covenants are sorted by test date (oldest to newest), allowing you to prioritise those requiring your attention.
For each control listed, you will find :
- Covenant wording
- Status:
- Waiting: overdue. You can respond as soon as possible.
-
- Coming: you can respond at a later date.
- Result received: your entity has responded to the covenant (or the operation manager who has the authority to respond on your behalf).
- Validated: the operation manager has validated the covenant.
- Result KO: the value entered is not as expected. Example: the value of a ratio must be < 3 and the value entered is 3.5, the result will automatically appear KO. The operation manager will then have the option of validating the result or declaring a breach.
- Non-compliant: result flagged by manager; you may re-submit.
- Breach noted: breach recorded by manager; waivers can be issued if needed.
- Expected result: Document or value, depending on the nature.
- Result received: if a result is entered, “document” or “value X” will be displayed.
- Control date: the date appears only if the operation manager has controlled the covenant.
- Covenant test date and deadline.
- The result of the waiver vote.
After processing by the operation manager, controls are tracked in “Archived Controls” (top-right of your screen), accessible for future reference. Completed controls are removed from your main dashboard.
Archiving rules:
- Syndicated loan. Operation manager validates/declares a breach and shares the result with the pool.
- Bilateral loan: Operation manager validates/declares a breach and archives the covenant.
Filters help you find the relevant covenants easily:

For example, “Risk of breach” aggregates overdue, KO, and non-compliant controls.
How to respond to a covenant?
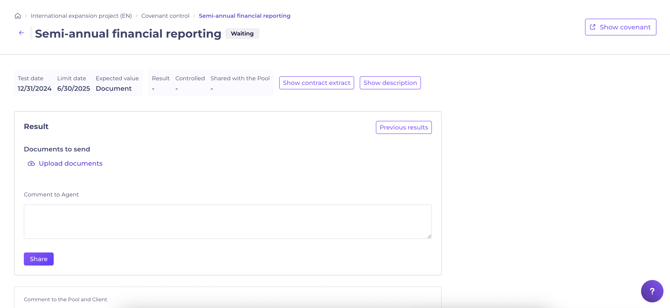
Select the covenant in the Covenant control tab.
Indicate whether the expected item is a document or value.
- If a document: upload relevant files.
- If a value: enter the required numerical/text value, with optional supporting documents.
Once completed, click “Share”. The operation manager is notified instantly and can review your submission.
“Previous results” lets you see earlier responses for recurring covenants.
“Show contract extract” shows test dates, deadlines, frequency, contract extracts, and related details. Consult the section on covenant list
"Show description" shows details the Agent wants to share.
💡 You may add a comment for the operation manager before submitting your result.
d. Covenant list

This tab displays all contract covenants as registered by the operation manager. The settings here determine the controls you will see in the covenant control tab.
4. Automated notifications

You will automatically receive email notifications regarding operation related events. All contacts from your entity to an operation receive these by default when:
- A covenant expires or its due date passes (also sent to the operation manager).
- A result is declared non-compliant, or a breach is reported by the operation manager.
- Covenants have been validated.
- New documentation is added to the dataroom by the operation manager.
Operation managers are also automatically notified when:
- You respond to a covenant.
- You upload new documentation to the dataroom.
- Notifications are sent from no-reply@kls-desk.com
- The operation manager may also send personalised notifications.
- Only the operation manager governs which notifications are sent to your entity.