
Contents |
1. Introduction to how Access management work
Being authorised to use Kls Desk means that you have access to one of the Desk's apps through a client financial institution.
It is possible to be authorised on behalf of several institutions; in this case, when the user logs in, he or she can choose his or her environment according to the entries provided.
Access is defined by having one's email address entered as a contact on behalf of a financial institution. Every user of an app, whether a customer or not, therefore has authorisation.
However, there is a difference in access management for users of a client financial institution (holding a Desk licence) and those of a non-client financial institution (simply invited): The “Access management” page.
If you are a user of the Desk on behalf of a non-client financial institution, access is managed reactively and only by invitation from a client financial institution, on a per-transaction basis.
Conversely, a client financial institution can proactively manage its employees' authorisations via a dedicated page.
The “Access management” page enables you to:
- Manage your organisation chart;
- Add or archive users on behalf of your entity;
- Assign personalised roles and rights to each user.
The authorisation phase is discussed with your Kls contact during the Onboarding process.
It is then your responsibility to ensure the continuity and sustainability by regularly adjusting the list of your collaborators/users.
2. Desk Kls: roles
- Team leader:
This role is frequently assigned to team managers or those responsible for managing tool/software authorisations on behalf of employees.
It grants the following rights, solely for the entity or entities where the user is authorised:
- Access the “Access management” page
- Create/manage teams
- Create/manage user access
By capillarity, a Team Manager sees and has access to transactions created and managed by users in his or her team and in lower-level teams. If a Team Leader is added to a team, he or she automatically gains viewing and access rights to the transactions of users present in that team, as well as users in related lower-level teams.
A Team Leader empowered at root team level (see below) will therefore have full visibility of all existing transactions on the Kls Desk.
The Team Leader will also has the responsibility of regularly consulting the guests team in order to perpetuate or withdraw access for users who have been invited on behalf of your entity by others.
- User:
The “User” role is a simple user. You become a user as soon as you have been entered as a contact within a entity.
It has no specific capabilities beyond the rights assigned to it (see rights below), and will only be able to view items it has created (if it has the right to do so) or to which it has been specifically invited by a peer.
3. Request access to an application
To obtain access to Debt Tracking, Debt Eligibility or Debt Syndication, any platform user can use the "Who can grant me access?" button, accessible from the header of the "Permissions" page. This button is available regardless of your profile.
a. Use the "Who can grant me access?" feature
Clicking this button opens a modal window. It presents a guided flow in the form of a sentence to complete:
I want to access [Product] as [Role].
The flow unfolds in two or three steps depending on the selected application:
- Choose the application: Debt Tracking, Debt Eligibility or Debt Syndication. Only the applications available within your organisation are enabled. Unavailable applications appear greyed out, accompanied by a message inviting you to contact your usual support team.
- Choose the journey (Debt Eligibility only): if your organisation uses both the Debt Eligibility application and its CDC journey, an intermediate step invites you to specify which access you need. If your organisation only has access to Debt Eligibility, this step is omitted automatically.
- Choose the role: select the role corresponding to your scope of work. Only the roles available for assignment within your organisation are displayed.
The "View who can grant me access" button becomes active once all steps are completed. You can modify your selections at any time by clicking the elements of the sentence. Changing an earlier selection automatically resets the subsequent steps.
A "Learn more" link at the bottom of the window redirects to this knowledge base article to view the description of available products and roles.
b. View the "Request Rights" page
After clicking "View who can grant me access", the "Request Rights" page is displayed. It lists the people authorised to grant you the requested right within your organisation.
For each team manager or point of contact, the page displays their name, their team (for information purposes) and their email address. Click the copy icon to the right of an address to copy it to your clipboard, then contact the person directly by email specifying the product and role required.
The "Change" button lets you reopen the selection window to modify your request without going back to the "Permissions" page.
If no authoriser has yet been set up for the requested context within your organisation, a message directs you to your usual support team so that an authoriser can be designated.
4. Access management
Permissions management — adding, editing and archiving users, creating teams — is restricted to users with the "Team Leader" role. It allows you to manage colleagues' access within your organisation
To access it, follow these steps:
- Log in to the platform
- Hover over the entity icon at the bottom left of your screen
- Click on “Access management”
a. Basic functions
When you become a Kls customer, at your first login to the Access management, you will find an organisation chart consisting of a single team—the root team. It's from here that the other teams can be created. Once onboarding is complete, the root team should contain only the highest hierarchical managers.
This page is divided into three tabs:
- The “Authorised” tab: contains users who have been assigned to one of the entity’s teams and granted access rights.
- The “Guests” tab: contains users who have been invited to participate in an transaction in Debt Syndication or Debt Tracking but not been authorised. They are not in any of the teams in the organisation chart and have no rights except for the transactions they have been invited.
- The “Archived” tab: contains users whose access rights have been revoked. They no longer have access to the platform via this entity.
Two views are available:
The Chart (by default): This view is automatically centred on your team. A search bar enables you to quickly find a user or a team.
The List: This view allows you to create filters by role, team, and product, as well as search by username.
b. Create a team
When creating a new team, the team leader has two options: at the same level as an existing team, or below an existing team.
By hovering the cursor over an existing team, you may decide where to add the new team, using the (+) symbol that appears (in this case, below or next to it).
When teams are on the same level, there is no connection between them. This creates a veritable "Chinese wall" between two teams, as user activity on one team will be completely invisible to the other.
Conversely, when a team is created beneath another, it is possible to implement the principle of capillarity, enabling “higher” teams to view activities carried out by the collaborators in the “lower” team.
The capillarity principle applies ONLY to users with the role of team leader.
A “standard user” only has access to the transactions they have created and those to which they have been invited.
In this way, a manager of a group of collaborators split across several teams can maintain an overview of the activity of their teams, without one teams being able to see the activity of another.
You may edit a team’s name at any time by clicking on the desired team and selecting “rename team”.
c. Create (or modify) a user
Only a user with the Team Leader role can add or modify a user.
He or she may act only on the team in which he or she is empowered, as well as on any subordinate teams.
The Team Leader will not be able to take action regarding an employee or a team that does not correspond to their area of responsibility.
If a colleague asks you for authorisation and you are not able to manage their profile, identify the team to which they belong in order to redirect them to the relevant Team leader(s).
To create a new user, simply go to the Access management page. Then you have two options:
- Create a user directly using the “Add some users” button within the organisation chart view.
- Create a user after clicking on the team to which they will be assigned. In this case, the team selection will be pre-filled.
There are three steps to add the user:
- Enter basic information: email address, team, and markets
- Specify the role
- Specify access rights
💡 You may authorise multiple users at the same time if they have the same rights and belong to the same team.

Enter the contact’s email address and confirm by pressing “Enter”.
Once validated, a new entry will appear in the list of team users, displaying the collaborator's email address and the message “Invitation sent by email”. This signifies that the new user has received an email from no-reply@kls-desk.com to initialise the account (set a password and complete details). Once their profile is completed, you will see the first name and last name.
By clicking on the three dots at the end of the row, you can at any time:
- Edit a user’s access rights
- Change a user’s team
The only information that cannot be changed is the user’s email address. Please double-check your entry before confirming creation.
If a user has been created in error, they must be archived.
i. Assign markets
When settling up user profiles, you may customise their scope of access.
There are 8 different markets: Corporate, Pro, Agriculture, Public Authorities, Renewable Energy, Real Estate development, Public-Private Partnership, and Wealth Management.
The markets assigned to a user have the following impacts:
- Debt Syndication:
- A user with creation rights in Debt Syndication may only create transactions for the markets for which they are authorised.
- When inviting a Kls client entity, the list shows:
- First, users authorised for the relevant market to the specific transactions
- Second, those authorised for the other markets
- Debt Tracking: The markets assigned to a user do not affect their use of this app.
- Debt Eligibility:
- A programme manager may create and access programmes for the markets in which they are authorised.
A distributor may access and make reservations in programmes pertaining to the markets for which they are authorised. - The markets assigned to a user are of primary importance whenever their entity is invited to an operation via Kls Desk.
- A programme manager may create and access programmes for the markets in which they are authorised.
ii. Assign creation rights
As Kls is a multi-app software publisher, you may use our tools in several ways depending on your subscriptions.
You can assign creation rights by app in the Desk, specifically:
- Debt Syndication: allows a user to create financing transactions collaboratively with their partners. See the article on How to create and manage an transaction in the Debt Syndication app.
- Debt Tracking: allows a user to create syndicated and/or bilateral transactions in conjuction with lenders, clients, and internal teams. See the article on How to create and publish an transaction in Debt Tracking.
- Debt Eligibility – CDC journey: See the article on specific rights for the CDC journey (currently under construction).
To assign rights to a user in Debt Eligibility (standard journey), the user must hold the “Referent” role. Depending on their position (programme manager or distributor), if they are a referent, they can in turn grant this role to others. See the article on specific rights for the Debt Eligibility app.
iii. Paid seats
Definition: A user who has creation rights for at least one Desk Kls application in a client entity and at a given moment occupies a paid seat.
This information, which can be viewed on the authorisations page, allows team managers to check the number of paid seats occupied within the entity or a specific team at any time.
The cost of your Kls subscription may vary depending on the number of users occupying a paid seat. This information is visible in your contract, so please refer to it if necessary.
A user with creation rights for multiple applications occupies a single paid seat.
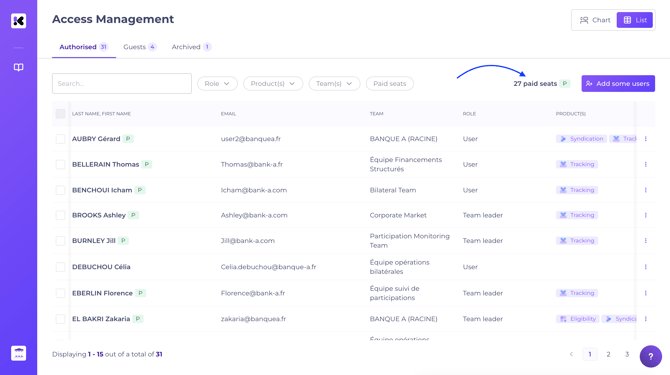
On the authorisations page, a paid seat is symbolised by a green ‘P’ visible for each user concerned.
How can I view this information?
There are two ways to view the number of paid seats: either the total number of paid seats occupied in your entity or the number of seats in a specific team.
- To view the number of paid seats occupied in a specific team: in the organisation chart view, click on the desired entity. The information is visible at the top right of your screen, ‘X paid seats’:
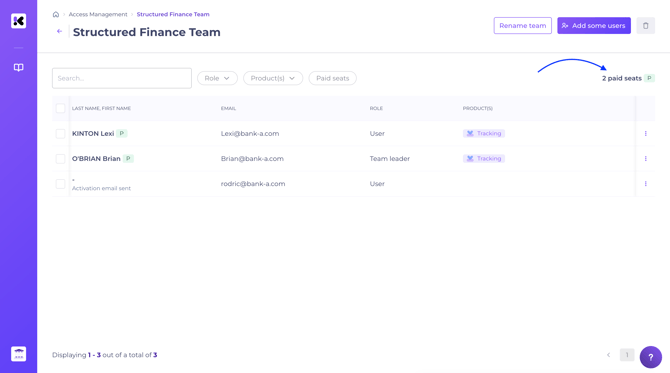
- To view the total number of paid seats occupied in your entity: in the list view, the information is visible at the top right of your screen, ‘X paid seats’:
This information changes in real time based on the rights assigned/withdrawn from users in your organisation.
d. Archiving and access management
A Team Leader may archive a user who falls within their scope. This action instantly deactivates the user’s access. The user will therefore lose access to all transactions.
To archive a user:
- In the Chart view, click on the team of which the user is a member. In the corresponding row for the user, click the three dots at the end of the row, then select “archive”.
- In the List view, use the search bar to enter the user’s first name, last name, or email address to easily find them. Then click the three dots at the end of the row and select “archive”.
- As soon as a user leaves your organisation, archive them.
- Archiving is reversible. To unarchive a user, go to "Archived" section, follow the same process and click on “Unarchive”.